06. Section 3: Integrating into a Clinical Network
Section 3: Integrating into a Clinical Network
In this final section you will use some of the work you did for Section 2 to create an AI product that can be integrated into a clinical network and provide the auto-computed information on the hippocampal volume to the clinicians. While hospital integrations are typically handled by hospital IT staff, it will help tremendously if you can talk the same language with the people who will operate your model, and will have a feel for how clinical radiological software works. These skills will also help you debug your model in the field.
You will perform this section in a different workspace than the previous two sections: Workspace for Section 3. This workspace is a simpler hardware, with no GPU, which is more representative of a clinical environment. This workspace also has a few tools installed in it, which is replicates the following clinical network setup:
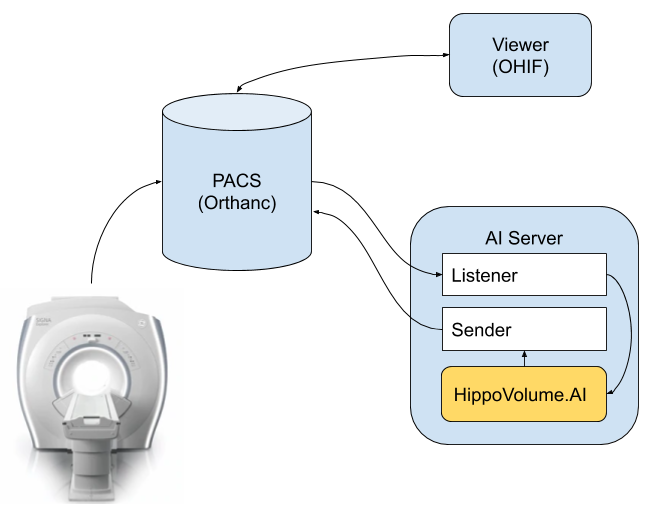
Network setup emulated by Workspace 2
Specifically, we have the following software in this setup:
- MRI scanner is represented by a script
section3/src/deploy_scripts/send_volume.sh. When you run this script it will simulate what happens after a radiological exam is complete, and send a volume to the clinical PACS. Note that scanners typically send entire studies to archives.
*PACS server is represented by Orthanc deployment that is listening to DICOM DIMSE requests on port 4242. Orthanc also has a DicomWeb interface that is exposed at port 8042, prefix /dicom-web. There is no authentication and you are welcome to explore either one of the mechanisms of access using a tool like curl or Postman. Our PACS server is also running an auto-routing module that sends a copy of everything it receives to an AI server. See instructions ad the end of this page on how to launch if you are using the Udacity Workspace. - Viewer system is represented by OHIF. It is connecting to the Orthanc server using DicomWeb and is serving a web application on port 3000. Again, see instructions at the end of this page if you are using the Udacity Workspace.
- AI server is represented by a couple of scripts.
section3/src/deploy_scripts/start_listener.shbrings up a DCMTK'sstorescpand configures it to just copy everything it receives into a directory that you will need to specify by editing this script, organizing studies as one folder per study. HippoVolume.AI is the AI module that you will create in this section.
If you want to replicate this environment on your local machine, you will find instructions in the Project Overview concept.
As with Section 2, in the directory called section3/src you will find the source code that forms the skeleton of the HippoVolume.AI module.
inference_dcm.py is the file that you will be working on. It contains code that will analyze the directory of the AI server that contains the routed studies, find the right series to run your algorithm on, will generate report, and push it back to our PACS.
Note that in real system you would architect things a bit differently. Probably, AI server would be a separate piece of software that would monitor the output of the listener, and would manage multiple AI modules, deciding which one to run, automatically. In our case, for the sake of simplicity, all code sits in one Python script that you would have to run manually after you simulate an exam via the send_volume.sh script - inference_dcm.py. It combines the functions of processing of the listener output and executing the model, and it does not do any proper error handling :)
As before, you will need to follow the instructions inside the code files to complete the section and create your AI module. Same convention is used as in Sections 1 and 2: comments that start with # TASK instruct you to create certain code snippets, and all other types of comments provide background or stand-out suggestions.
You will need to complete all the instructional comments in the code in order to complete this section. You can do this in any order, but it makes most sense to start with the code in inference_dcm.py.
Once you complete the code, you can test it by running
deploy_scripts/send_volume.sh
which will simulate a completion of MRI study and sending of patient data to our PACS, and then following that by running inference_dcm.py
The send_volume.sh script needs to be run from directory section3/src (because it relies on relative paths). If you did everything correctly, an MRI scan will be sent to the PACS and to your module which will compute the volume, prepare the report and push it back to the PACS so that it could be inspected in our clinical viewer.
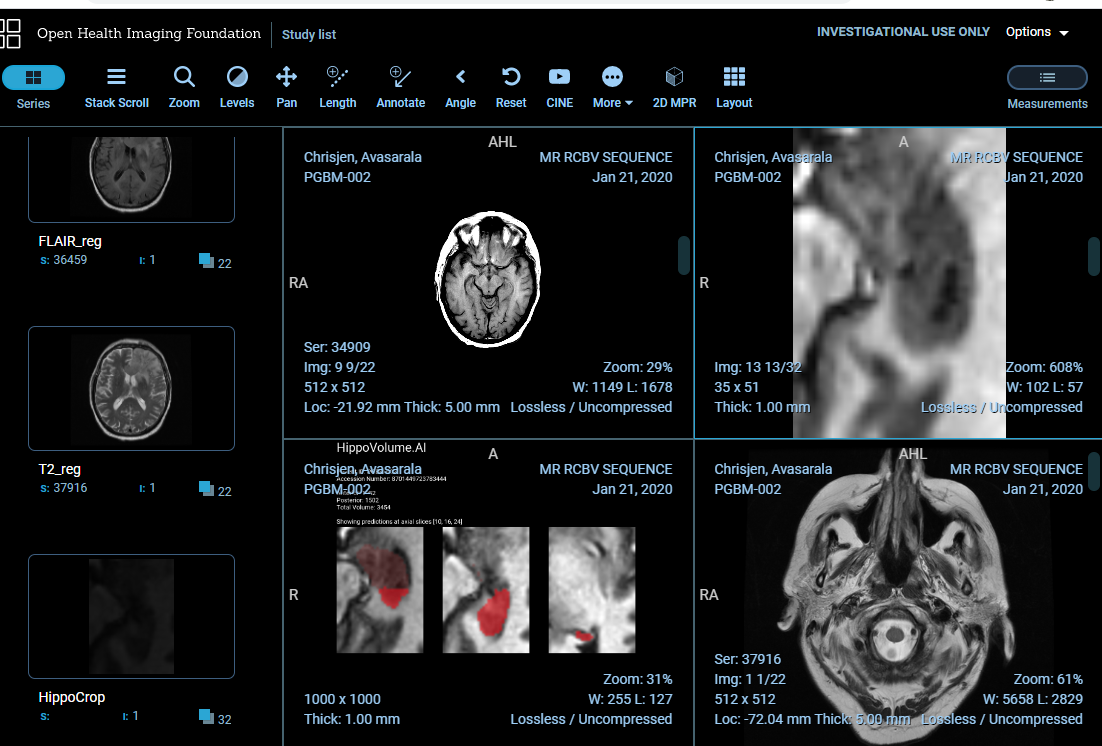
At this point, go to [YOUR IP ADDRESS]:3000 (can be another port if you are using Udacity Workspace) which brings up our OHIF viewer. You should be able to inspect your report in all its glory, in the context of a radiological study presented to a radiologist in a clinical viewer!
The study that send_result.sh sends, and a few other sample studies are located in /data/TestVolumes. Feel free to modify the script to try out your algorithm with other volumes.
Note, that the DICOM studies used for inferencing this section have been created artificially, and while full-brain series belong to the same original study, this is not the study from which the hippocampus crop is taken.
Now that you have built a radiological AI system and given it to clinicians, you can start collecting data on how your model performs in the real world. If you (or the company you work for) intends to commercialize your technology, you will have to clear the regulatory bar. As we have discussed in our final lesson, an important contribution of an AI engineer to this endeavor is helping execute the clinical validation by contributing to a validation plan. Your final task in this course is to write a draft of such plan (shoot for 1-2 pages for this exercise). Remember - clinical validation is all about proving that your technology performs the way you claim it does. If you are saying that it can measure hippocampal volume, your validation needs prove that it actually does, and establish the extents to which your claim is true. Your validation plan needs to define how you would prove this, and establish these extents.
For the purpose of this exercise, assume that you have access to any clinical facility and patient cohorts you need, and that you have all the budget in the world. In your plan, touch on at least the following:
- Your algorithm relies upon certain "ground truth" - how did you define your ground truth? How will you prove that your method of collecting the ground truth is robust and represents the population that you claim this algorithm is good for?
- How do you define accuracy of your algorithm and how do you measure it with respect to real world population? Check out the calculator and report from HippoFit for some inspiration.
- How do you define what data your algorithm can operate on?
There is no right answer here - think of these and other questions that would come up during validation of such algorithm. Thinking of such things early on will help you build better algorithms in the first place.
Instructions
Once you complete this section, copy the following into directory section3/out:
- Code that runs inference on a DICOM volume and produces a DICOM report
- A report.dcm file with a sample report
- Screenshots of your report shown in the OHIF viewer
- 1-2 page Validation Plan
Stand-out Suggestions
Optionally, look into the following to explore the subject deeper and make your project stand out. Put the deliverables in the output directory.
- Can you propose a better way of filtering a study for correct series?
- Can you think of what would make the report you generate from your inference better? What would be the relevant information that you could present which would help a clinician better reason about whether your model performed well or not?
- Try to construct a fully valid DICOM as your model output (per DICOM PS3.3#A8) with all relevant fields. Construction of valid DICOM has a very calming effect on the mind and body.
- Try constructing a DICOM image with your segmentation mask as a separate image series so that you can overlay it on the original image using the clinical image viewer and inspect the predicted volume better. Note that OHIF does not support overlaying - try using Slicer 3D or Radiant (Fusion feature). Include screenshots.
Udacity Workspace Notes
You can access the Desktop when you hit the button at the bottom right-hand corner.
Upload the Trained Model
- Click on the + at the upper right hand corner of the folder panel.
- One of the options is to upload a file which you can use to upload your model (.pth file) from the previous section and any other content you would like to bring over.
Running Shell Scripts inside the Workspace
In this exercise, you will need to run shell scripts from the deploy_scripts folder. These scripts won't work inside Udacity Workspace if you try to run the .sh files directly. In order to run these scripts from the Udacity Workspace you will need to copy the lines from within the .sh files, paste them into your terminal and run from there.
Access Orthanc and OHIF
Before starting to work on the tasks in this workspace you should launch Orthanc and OHIF and here are the steps:
- Open a terminal and enter the following:
bash launch_orthanc.shor./launch_orthanc.sh. Don't close this terminal - Wait for it to complete, with the last line being something like
W0509 05:38:21.152402 main.cpp:719] Orthanc has startedand/or you can verify that Orthanc is working by runningechoscu 127.0.0.1 4242 -vin a new terminal. - Open a new terminal and enter the following
bash launch_OHIF.shor./launch_OHIF.sh. Don't close this terminal - Wait for it to complete, with the last line being something like
@ohif/viewer: ℹ 「wdm」: Compiled with warnings. - You will then want to enter the Desktop with the bottom right hand corner.
- OHIF should automatically open in a Chromium Web Browser but if not you can paste
localhost:3005into the address bar of a Chromium Window. - orthanc isn't necessary to open but if you need it you can access it can paste
localhost:8042into the address bar of a Chromium Window.
- OHIF should automatically open in a Chromium Web Browser but if not you can paste